開始使用 TFLearn
這是一個基本的入門指南,說明 TFLearn 及其功能。首先,重點說明用於快速建構神經網路和訓練的 TFLearn 高階 API,並說明 TFLearn 層、內建運算和幫手如何直接讓使用 Tensorflow 的任何模型實作受益。
使用高階 API
TFLearn 引進一個高階 API,讓建構神經網路和訓練變得快速且容易。這個 API 非常直覺,且完全相容於 Tensorflow。
層
層是 TFLearn 的核心特色。雖然完全使用 Tensorflow 運算定義模型會耗時且重複,但 TFLearn 引進了「層」,表示一組抽象的運算,讓建構神經網路變得更方便。例如,一個卷積層會
- 建立並初始化權重和偏誤變數
- 套用卷積於輸入張量
- 在卷積之後加入啟動函數
- 等
在 Tensorflow 中,寫這些類型的運算會很繁瑣
with tf.name_scope('conv1'):
    W = tf.Variable(tf.random_normal([5, 5, 1, 32]), dtype=tf.float32, name='Weights')
    b = tf.Variable(tf.random_normal([32]), dtype=tf.float32, name='biases')
    x = tf.nn.conv2d(x, W, strides=[1, 1, 1, 1], padding='SAME')
    x = tf.add_bias(x, b)
    x = tf.nn.relu(x)
而在 TFLearn 中,它只需要一行
tflearn.conv_2d(x, 32, 5, activation='relu', name='conv1')
以下是所有目前可用的層之清單
| 檔案 | 層 |
|---|---|
| 核心 | 輸入資料、全連接、中斷、自訂層、重新調整大小、扁平化、啟動、單元、高速公路、獨熱編碼、時間分佈 |
| 卷積 | 2D 卷積、2D 卷積轉置、2D 最大池化、2D 平均池化、2D 上取樣、1D 卷積、1D 最大池化、1D 平均池化、殘差區塊、殘差瓶頸、3D 卷積、3D 最大池化、3D 平均池化、1D 高速公路卷積、2D 高速公路卷積、全局平均池化、全局最大池化 |
| 遞迴 | 簡單 RNN、LSTM、GRU、雙向 RNN、動態 RNN |
| 嵌入 | 嵌入 |
| 正規化 | 批次正規化、區域響應正規化、L2 正規化 |
| 合併 | 合併、合併輸出 |
| 估計器 | 迴歸 |
內建運算
除了層的概念外,TFLearn 還提供許多不同的運算元可以在建立神經網路時使用。這些運算元主要是要作為上述「層」引數的一部分,但也可以在任何其他 Tensorflow 函數中獨立使用,以方便使用。實際上,只要提供運算元名稱做為引數就夠了(例如 conv_2d 的 activation='relu' 或 regularizer='L2'),但也可以提供函數做進一步的自訂。
| 檔案 | 運算元 |
|---|---|
| 啟用函數 | linear、tanh、sigmoid、softmax、softplus、softsign、relu、relu6、leaky_relu、prelu、elu |
| 目標函數 | softmax_categorical_crossentropy、categorical_crossentropy、binary_crossentropy、mean_square、hinge_loss、roc_auc_score、weak_cross_entropy_2d |
| 最佳化器 | SGD、RMSProp、Adam、Momentum、AdaGrad、Ftrl、AdaDelta |
| 評量指標 | Accuracy(準確率)、Top_k、R2 |
| 初始化器 | zeros、uniform、uniform_scaling、normal、truncated_normal、xavier、variance_scaling |
| 損失函數 | l1、l2 |
以下是幾個快速範例
# Activation and Regularization inside a layer:
fc2 = tflearn.fully_connected(fc1, 32, activation='tanh', regularizer='L2')
# Equivalent to:
fc2 = tflearn.fully_connected(fc1, 32)
tflearn.add_weights_regularization(fc2, loss='L2')
fc2 = tflearn.tanh(fc2)

# Optimizer, Objective and Metric:
reg = tflearn.regression(fc4, optimizer='rmsprop', metric='accuracy', loss='categorical_crossentropy')
# Ops can also be defined outside, for deeper customization:
momentum = tflearn.optimizers.Momentum(learning_rate=0.1, weight_decay=0.96, decay_step=200)
top5 = tflearn.metrics.Top_k(k=5)
reg = tflearn.regression(fc4, optimizer=momentum, metric=top5, loss='categorical_crossentropy')
訓練、評估及預測
訓練函數是 TFLearn 的另一個核心功能。在 Tensorflow 當中,並沒有預先建置的介面可以做網路訓練,因此 TFLearn 整合了一組函數,可以輕易處理任何種類的神經網路訓練,不論輸入輸出和最佳化器數量為何。
使用 TFlearn 層時,許多參數都已經自我管理了,因此使用 DNN 範例類別就可以很輕易地訓練模型。
network = ... (some layers) ...
network = regression(network, optimizer='sgd', loss='categorical_crossentropy')

model = DNN(network)
model.fit(X, Y)
也可以直接呼叫此類別做預測或評量。
network = ...

model = DNN(network)
model.load('model.tflearn')
model.predict(X)
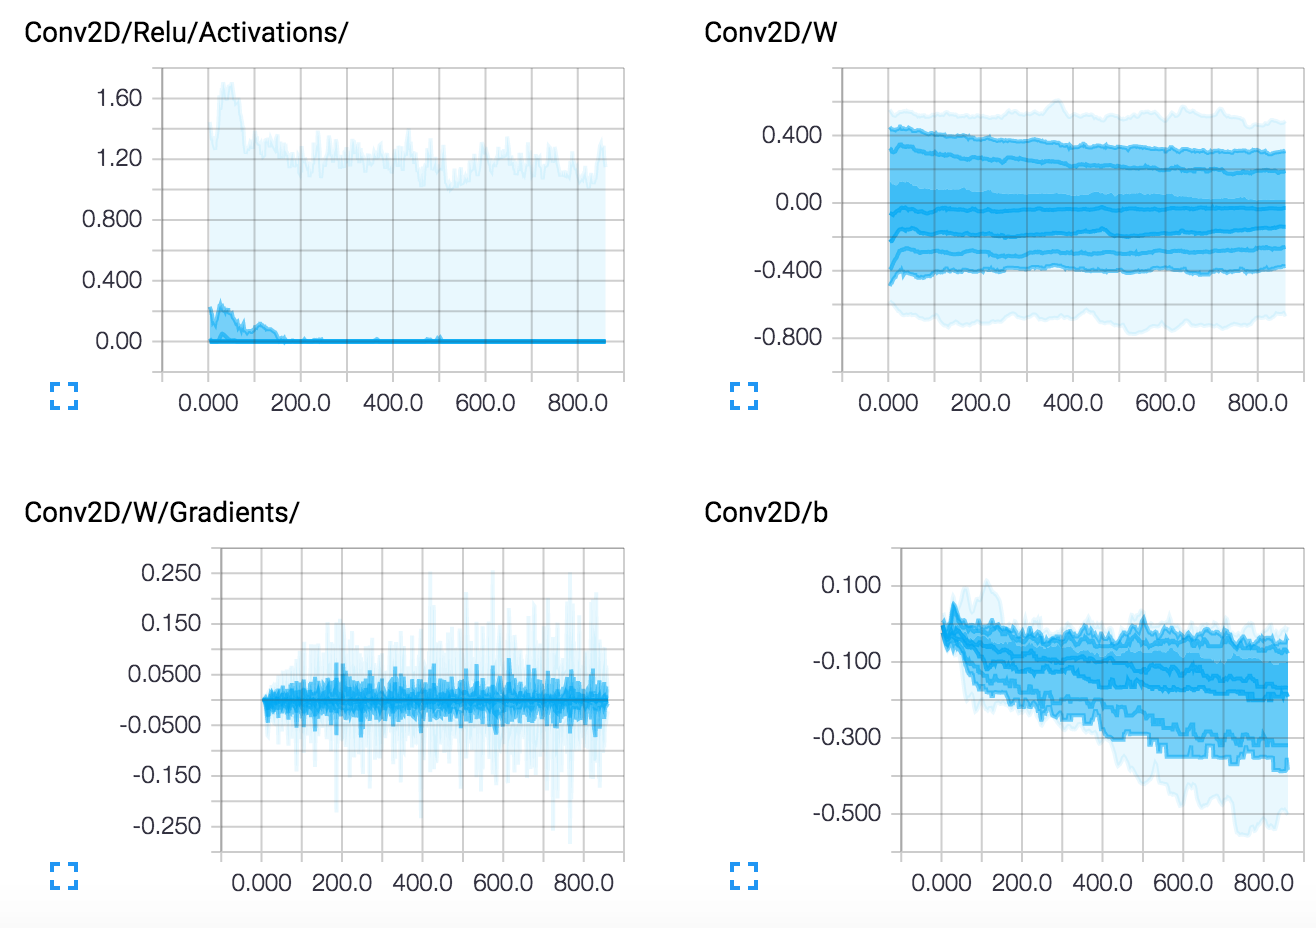
視覺化
編寫 Tensorflow 模型和新增 tensorboard 摘要並不是很實用,而 TFLearn 能夠自我管理許多有用的記錄。目前,TFLearn 支援詳細層級,可以自動管理摘要
- 0:損失與評量指標(最佳速度)。
- 1:損失、評量指標和梯度。
- 2:損失、評量指標、梯度和權重。
- 3:損失、評量指標、梯度、權重、啟用函數和稀疏性(最佳視覺化)。
如果使用 DNN 範例類別,只要指定詳細引數即可
model = DNN(network, tensorboard_verbose=3)
然後,就可以執行 Tensorboard,將網路和效能視覺化
$ tensorboard --logdir='/tmp/tflearn_logs'
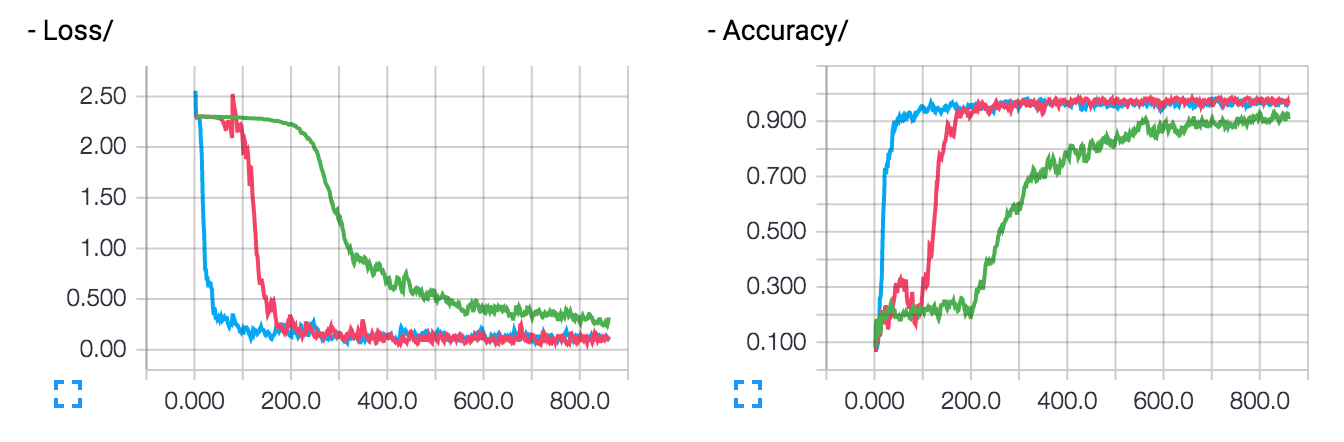
圖表
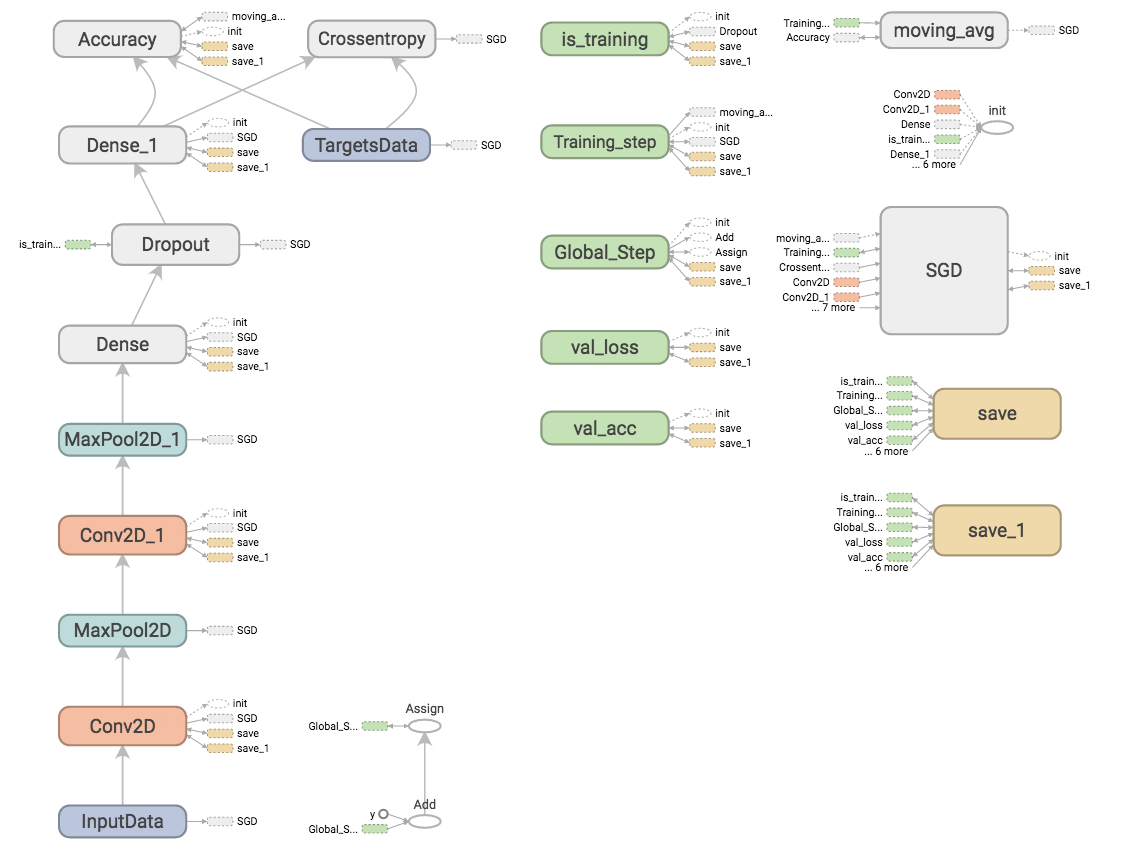
損失和準確率(多次執行)
層
權重持久性
要儲存或復原模型,只要呼叫 DNN 範例類別的「儲存」或「載入」方法即可。
# Save a model
model.save('my_model.tflearn')
# Load a model
model.load('my_model.tflearn')
擷取層變數的方法有兩種:一是使用層名稱,另一種則是直接使用「W」或「b」屬性,這些屬性會加強層回傳的 Tensor。
# Let's create a layer
fc1 = fully_connected(input_layer, 64, name="fc_layer_1")
# Using Tensor attributes (Layer will supercharge the returned Tensor with weights attributes)
fc1_weights_var = fc1.W
fc1_biases_var = fc1.b
# Using Tensor name
fc1_vars = tflearn.get_layer_variables_by_name("fc_layer_1")
fc1_weights_var = fc1_vars[0]
fc1_biases_var = fc1_vars[1]
要取得或設定這些變數的值,TFLearn 模型類別會實作 get_weights 和 set_weights 方法
input_data = tflearn.input_data(shape=[None, 784])
fc1 = tflearn.fully_connected(input_data, 64)
fc2 = tflearn.fully_connected(fc1, 10, activation='softmax')
net = tflearn.regression(fc2)
model = DNN(net)
# Get weights values of fc2
model.get_weights(fc2.W)
# Assign new random weights to fc2
model.set_weights(fc2.W, numpy.random.rand(64, 10))
請注意,你也可以直接使用 TensorFlow 的 eval 或 assign 運算元來取得或設定這些變數的值。
- 範例請參閱:weights_persistence.py。
微調
在很多情況下,微調一個在新任務上預訓練的模型可能很有用。因此,當在 TFLearn 中定義一個模型時,您可以指定您想要還原或不還原哪個層的權重(當加載預訓練的模型時)。這可以用層函式的「復原」引數來處理(僅對於有權重的層)。
# Weights will be restored by default.
fc_layer = tflearn.fully_connected(input_layer, 32)
# Weights will not be restored, if specified so.
fc_layer = tflearn.fully_connected(input_layer, 32, restore='False')
所有不需要復原的權重都會加入到 tf.GraphKeys.EXCL_RESTORE_VARS 集合中,當加載預訓練的模型時,這些變數的復原只會被忽略。下列範例顯示如何透過復原最後一個全連接層以外的所有權重在一個新任務上微調一個網路,然後在一個新的資料集上訓練新的模型。
- 微調範例: finetuning.py.
資料管理
TFLearn 支援 numpy 陣列資料。此外,它也支援 HDF5 來處理大型資料集。HDF5 是用於儲存及管理資料的資料模型、函式庫與檔案格式。它支援無限種類的資料類型,設計用於彈性且有效的 I/O,以及大量且複雜的資料(更多資訊)。TFLearn 可以直接使用 HDF5 格式的資料。
# Load hdf5 dataset
h5f = h5py.File('data.h5', 'r')
X, Y = h5f['MyLargeData']

... define network ...

# Use HDF5 data model to train model
model = DNN(network)
model.fit(X, Y)
請參閱範例: hdf5.py.
資料前處理和資料增強
在訓練模型時,經常會執行資料前處理和資料擴增,因此 TFLearn 提供包裝器以便輕鬆地處理。另外,也請注意 TFLearn 資料串流是設計成運算管線,以便加快訓練速度(透過在 CPU 上前處理資料,而 GPU 在執行模型訓練)。
# Real-time image preprocessing
img_prep = tflearn.ImagePreprocessing()
# Zero Center (With mean computed over the whole dataset)
img_prep.add_featurewise_zero_center()
# STD Normalization (With std computed over the whole dataset)
img_prep.add_featurewise_stdnorm()

# Real-time data augmentation
img_aug = tflearn.ImageAugmentation()
# Random flip an image
img_aug.add_random_flip_leftright()

# Add these methods into an 'input_data' layer
network = input_data(shape=[None, 32, 32, 3],
                     data_preprocessing=img_prep,
                     data_augmentation=img_aug)
範圍和權重共享
所有層都建立在「variable_op_scope」上,這使得在多個層之間分享變數變得容易,而且使 TFLearn 適用於分散式訓練。所有具備內部變數的層都支援用於放置變數底下的「範圍」引數;具有相同範圍名稱的層將會分享相同的權重。
# Define a model builder
def my_model(x):
    x = tflearn.fully_connected(x, 32, scope='fc1')
    x = tflearn.fully_connected(x, 32, scope='fc2')
    x = tflearn.fully_connected(x, 2, scope='out')

# 2 different computation graphs but sharing the same weights
with tf.device('/gpu:0'):
    # Force all Variables to reside on the CPU.
    with tf.arg_scope([tflearn.variables.variable], device='/cpu:0'):
        model1 = my_model(placeholder_X)
# Reuse Variables for the next model
tf.get_variable_scope().reuse_variables()
with tf.device('/gpu:1'):
    with tf.arg_scope([tflearn.variables.variable], device='/cpu:0'):
        model2 = my_model(placeholder_X)

# Model can now be trained by multiple GPUs (see gradient averaging)
...
圖形初始化
在訓練期間限制資源,或分配更多或更少的 GPU RAM 記憶體可能很有用。要這樣做,可以使用圖形化設定檔在執行前設定一個圖形。
tflearn.init_graph(set_seed=8888, num_cores=16, gpu_memory_fraction=0.5)
- 請參閱: 設定檔。
擴充 Tensorflow
TFLearn 是個非常靈活的函式庫,設計讓您可以獨立使用其任何元件。可以使用 Tensorflow 運算和 TFLearn 內建層與運算的任何組合,來簡潔地建立一個模型。以下說明將向您展示使用 TFLearn 擴充 Tensorflow 的基礎知識。
層
任何層都可以和其他任何來自 Tensorflow 的張量一起使用,這表示您可以將 TFLearn 包裝器直接使用在您自己的 Tensorflow 圖形中。
# Some operations using Tensorflow.
X = tf.placeholder(shape=(None, 784), dtype=tf.float32)
net = tf.reshape(X, [-1, 28, 28, 1])

# Using TFLearn convolution layer.
net = tflearn.conv_2d(net, 32, 3, activation='relu')

# Using Tensorflow's max pooling op.
net = tf.nn.max_pool(net, ksize=[1, 2, 2, 1], strides=[1, 2, 2, 1], padding='SAME')

...
- 請參閱範例: layers.py。
內建運算
TFLearn 內建 ops 可讓 Tensorflow 的圖形寫作更快速且可讀性更高。因此,與 layers 相似,內建 ops 與任何 TensorFlow 程式表現完全相容。下列範例程式碼說明如何將這些程式碼與純 Tensorflow API 搭配使用。
- 請參閱:builtin_ops.py。
以下是可用 ops 的清單,按一下檔案以取得更多詳情
| 檔案 | 運算元 |
|---|---|
| 啟用函數 | linear、tanh、sigmoid、softmax、softplus、softsign、relu、relu6、leaky_relu、prelu、elu |
| 目標函數 | softmax_categorical_crossentropy、categorical_crossentropy、binary_crossentropy、mean_square、hinge_loss、roc_auc_score、weak_cross_entropy_2d |
| 最佳化器 | SGD、RMSProp、Adam、Momentum、AdaGrad、Ftrl、AdaDelta |
| 評量指標 | Accuracy(準確率)、Top_k、R2 |
| 初始化器 | zeros、uniform、uniform_scaling、normal、truncated_normal、xavier、variance_scaling |
| 損失函數 | l1、l2 |
注意:- 優化器設計為類別,而非函式,若要在 TFLearn 模組外部使用,請查看:optimizers。
訓練員 / 評估員 / 預測員
如果您使用您自己的 Tensorflow 模組,TFLearn 也提供一些「helper」函式,可訓練任何 Tensorflow 圖形。此設計便於訓練,能導入即時監控、批次抽樣、移動平均、TensorBoard 記錄、資料提供等等。它支援任何數目的輸入、輸出和最佳化程式。p>
TFLearn 執行 TrainOp 類別來表示最佳化處理程序(例如反向傳播)。它的定義如下
trainop = TrainOp(net=my_network, loss=loss, metric=accuracy)
然後,所有 TrainOp 可送入 Trainer 類別,此類別將處理整個訓練流程,將所有 TrainOp 視為整個模組的一部分。
model = Trainer(trainops=trainop, tensorboard_dir='/tmp/tflearn')
model.fit(feed_dict={input_placeholder: X, target_placeholder: Y})
雖然大多數模組只有一個最佳化處理程序,但對於較複雜的模組來說,處理多個最佳化處理程序會有所幫助。
model = Trainer(trainops=[trainop1, trainop2])
model.fit(feed_dict=[{in1: X1, label1: Y1}, {in2: X2, in3: X3, label2: Y2}])
-
若要深入了解 TrainOp 和 Trainer,請參閱:trainer。
-
範例請參閱:trainer.py。
對於預測,TFLearn 執行 Evaluator 類別,其作用方式類似 Trainer。它取得任何網路做為參數並傳回預測值。
model = Evaluator(network)
model.predict(feed_dict={input_placeholder: X})
- 若要深入了解 Evaluator 類別:evaluator。
處理在訓練時間和測試時間有不同行為的層(例如中斷和批次正規化)的網路,Trainer 類別會使用布林變數(「is_training」),用來指定網路是用於訓練或測試/預測。此變數會儲存在 tf.GraphKeys.IS_TRAINING 集合中,做為第一(且唯一)個元素。因此,在定義此類層時,此變數應做為 op 條件
# Example for Dropout:
x = ...

def apply_dropout(): # Function to apply when training mode ON.
  return tf.nn.dropout(x, keep_prob)

is_training = tflearn.get_training_mode() # Retrieve is_training variable.
tf.cond(is_training, apply_dropout, lambda: x) # Only apply dropout at training time.
為了簡化,TFLearn 會執行函式以擷取該變數或變更其值
# Set training mode ON (set is_training var to True)
tflearn.is_training(True)
# Set training mode OFF (set is_training var to False)
tflearn.is_training(False)
- 請參閱:training config。
訓練呼叫函數
在訓練週期中,TFLearn 可讓您追蹤訓練的量測並與量測互動,這些量測是透過 Callback 介面提供的函式所傳回的。為簡化量測擷取,每一個 callback 方法會收到 TrainingState,此狀態可追蹤狀態(例如:目前的 epoch、步驟、批次反覆)和量測(例如:目前的驗證準確度、整體準確度等等)。
與訓練週期相關的回呼方法:- on_train_begin(training_state) - on_epoch_begin(training_state) - on_batch_begin(training_state) - on_sub_batch_begin(training_state) - on_sub_batch_end(training_state, train_index) - on_batch_end(training_state, snapshot) - on_epoch_end(training_state) - on_train_end(training_state)
如何使用
假設你有一個自己的監視器用來追蹤所有訓練工作,而且你需要傳送量值給它。你可以輕易地自訂一個回呼,它會取得資料並把它傳送到遠端的監視器。我們需要建立一個自訂回呼,並在時期結束時呼叫的 on_epoch_end 中新增你的邏輯。
這會給你類似這樣的結果
class MonitorCallback(tflearn.callbacks.Callback):
    def __init__(self, api):
        self.my_monitor_api = api

    def on_epoch_end(self, training_state):
        self.my_monitor_api.send({
            accuracy: training_state.global_acc,
            loss: training_state.global_loss,
        })
然後你只需要把它新增到 model.fit 呼叫中
monitorCallback = MonitorCallback(api) # "api" is your API class
model = ...

model.fit(..., callbacks=monitorCallback)
callbacks 參數可以接受一個 Callback 或一個回呼的 list。這樣就完成了,你的自訂回呼會自動在每個時期結束時被呼叫。
變數
TFLearn 定義了一組函數,讓使用者能夠快速定義變數。
在 Tensorflow 中,變數建立需要預先定義的值或初始化器,以及明確的裝置放置,而 TFLearn 簡化了變數定義
import tflearn.variables as vs
my_var = vs.variable('W',
                     shape=[784, 128],
                     initializer='truncated_normal',
                     regularizer='L2',
                     device='/gpu:0')
- 例如,請參閱:variables.py。
彙總
使用 Trainer 類別時,管理摘要也很容易。它僅額外要求將要監控的啟動儲存在 tf.GraphKeys.ACTIVATIONS 彙總中。
然後,只需指定詳細層級即可控制可視化深度
model = Trainer(network, loss=loss, metric=acc, tensorboard_verbose=3)
除了 Trainer 自我管理摘要選項外,你還可以直接使用 TFLearn ops 將摘要快速新增到你目前的 Tensorflow 圖形中。
import tflearn.helpers.summarizer as s
s.summarize_variables(train_vars=[...]) # Summarize all given variables' weights (All trainable variables if None).
s.summarize_activations(activations=[...]) # Summarize all given activations
s.summarize_gradients(grads=[...]) # Summarize all given variables' gradient (All trainable variables if None).
s.summarize(value, type) # Summarize anything.
上面的每個函數都接受一個彙總作為參數,並且會傳回一個在該彙總上合併的摘要(預設名稱:「tflearn_summ」)。所以你只需要執行最後一個彙總器即可取得整個摘要 ops 彙總,它已經合併過了。
s.summarize_variables(collection='my_summaries')
s.Summarize_gradients(collection='my_summaries')
summary_op = s.summarize_activations(collection='my_summaries')
# summary_op is a the merged op of previously define weights, gradients and activations summary ops.
- 例如,請參閱:summaries.py。
正規器
使用 TFLearn regularizer 可以將正規化新增到模型中。它目前支援權重和啟動正規化。可用的正規化損失可以在這裡找到。所有正規化損失都儲存在 tf.GraphKeys.REGULARIZATION_LOSSES 彙總中。
# Add L2 regularization to a variable
W = tf.Variable(tf.random_normal([784, 256]), name="W")
tflearn.add_weight_regularizer(W, 'L2', weight_decay=0.001)
前處理
除了張量運算之外,對輸入資料進行一些前處理也可能很有用。因此,TFLearn 有一組前處理函數,可以讓資料操作更方便(例如序列填補、分類標籤、同調洗牌、影像處理等)。
- 如需更多詳細資訊,請參閱:data_utils。
進一步資訊
有很多範例還有許多神經網路實作供你練習 TFLearn 了解更多內容
- 參閱:示例。